February 13, 2025
Setting Up Hibernate ORM: Mapping Your First Database Entity in Java

How can Java apps connect to databases without hundreds of SQL lines? This ease is caused by Hibernate ORM. Hibernate automates database interactions, letting developers write business logic instead of database connection. This blogpost will help you set up Hibernate ORM in a Java project and map your first database object. This article will get you started with Hibernate quickly, whether you are beginner or a pro!
What is Hibernate ORM?
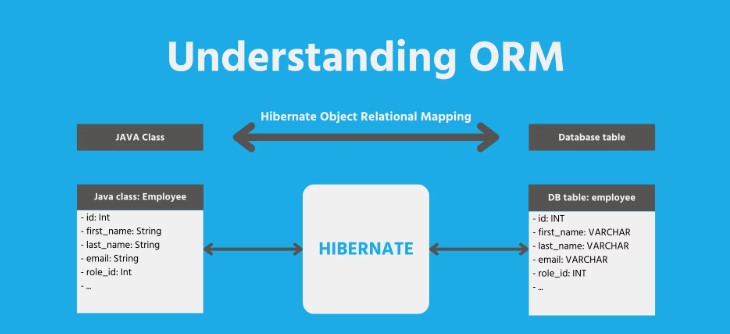
The complex Hibernate ORM framework facilitates Java application-relational database interface. By linking Java classes to database tables, Hibernate enables developers save, retrieve, and alter data without writing advanced SQL queries. Automatically transforms Java objects to SQL queries and vice versa.
Hibernate automates table building, database languages, and session management. This makes it ideal for Java developers who need a reliable and flexible persistent data management solution for any size application.
Java Project Hibernate Setup
Set up Hibernate in your project before mapping entities. This requires Hibernate configuration and dependencies.
Step 1. Add Dependencies
Start utilizing Hibernate by adding the necessary dependencies to your project. In Maven, add the following dependency to pom.xml:
<dependency>
 <groupId>org.hibernate</groupId>
 <artifactId>hibernate-core</artifactId>
 <version>5.6.10.Final</version>
</dependency>
For Gradle, include this in your build.gradle file:
implementation 'org.hibernate:hibernate-core:5.6.10.Final'
Step 2: Hibernate Configuration
Set up Hibernate to connect to your database. In hibernate.cfg.xml, specify database dialect, username, password, and more to connect.
Here's a basic look of configuration files look:
<hibernate-configuration>
 <session-factory>
 <!-- JDBC Database connection settings -->
 <property name="hibernate.dialect">org.hibernate.dialect.MySQLDialect</property>
 <property name="hibernate.connection.driver_class">com.mysql.cj.jdbc.Driver</property>
 <property name="hibernate.connection.url">jdbc:mysql://localhost:3306/mydb</property>
 <property name="hibernate.connection.username">root</property>
 <property name="hibernate.connection.password">password</property>

 <!-- JDBC connection pool settings -->
 <property name="hibernate.c3p0.min_size">5</property>
 <property name="hibernate.c3p0.max_size">20</property>

 <!-- Specify the JDBC driver -->
 <property name="hibernate.hbm2ddl.auto">update</property>
 <property name="hibernate.show_sql">true</property>
 </session-factory>
</hibernate-configuration>
Mapping Your First Entity Class
After Hibernate configuration, create your first entity class. Hibernate entities are Java classes that represent database tables. Create a simple Student class.
Step 3: Creating the Entity Class
To define an entity, label the class with @Entity and provide the database table with @Table. @Id indicates the entity's main key. Student entity example:
import javax.persistence.*;

@Entity
@Table(name = "students")
public class Student {
 @Id
 @GeneratedValue(strategy = GenerationType.IDENTITY)
 private int id;

 private String name;
 private int age;

 // Default constructor
 public Student() {}

 // Constructor with parameters
 public Student(String name, int age) {
 this.name = name;
 this.age = age;
 }

 // Getters and setters
 public int getId() {
 return id;
 }

 public void setId(int id) {
 this.id = id;
 }

 public String getName() {
 return name;
 }

 public void setName(String name) {
 this.name = name;
 }

 public int getAge() {
 return age;
 }

 public void setAge(int age) {
 this.age = age;
 }
}
This class defines a Student object with id, name, and age. Hibernate automatically generates the main key, id.
Creating the Hibernate Session Factory
After preparing the entity class, communicate with the database. SessionFactory helps here. Create, Read, Update, and Delete (CRUD) actions employ Session objects from the SessionFactory.
Step 4: Creating the SessionFactory
Here's how you can create a SessionFactory in your Java application:
import org.hibernate.Session;
import org.hibernate.SessionFactory;
import org.hibernate.cfg.Configuration;

public class HibernateUtil {
 private static SessionFactory sessionFactory;

 static {
 // Create SessionFactory from hibernate.cfg.xml
 sessionFactory = new Configuration().configure("hibernate.cfg.xml").addAnnotatedClass(Student.class).buildSessionFactory();
 }

 public static Session getSession() {
 return sessionFactory.openSession();
 }
}
This code sets up a SessionFactory and loads the Student entity class.
Saving the Entity to the Database
Save your Student object to the database after setup. For example, Hibernate offers Session.save().
Step 5: Saving Data Using Hibernate
To save a new Student object to the database, use the following code:
import org.hibernate.Session;
import org.hibernate.Transaction;

public class StudentApp {
 public static void main(String[] args) {
 // Get the session
 Session session = HibernateUtil.getSession();

 // Create a new student object
 Student student = new Student("John Doe", 22);

 // Begin transaction
 Transaction transaction = session.beginTransaction();

 // Save the student object
 session.save(student);

 // Commit transaction
 transaction.commit();

 // Close the session
 session.close();

 System.out.println("Student saved successfully!");
 }
}
This code generates a Student object, initiates a transaction, saves it, and commits it to save data in the database.
Conclusion
Congratulations! With Hibernate ORM, you have just mapped your first database object and saved some data. This blogpost discussed Hibernate setup, entity class creation, and database saving. This is only the beginning of Hibernate's capability. You will learn how to optimize queries, manage relationships, and customize Hibernate as you explore.
1.1k views